Installing the Components of a Kubernetes Cluster
In this post, we build a test cluster from scratch in order to check the installed components of the cluster and execute some deployments.
Prerequisites:
- Operating System Ubuntu 18.04.4
- One Master Node
- <N> Worker Node
- Internet connection to pull binaries and repositories
- Sudo access for user
Steps:
- Install the container runtime, as well as kubeadm, kubectl, and kubelet
- Initialize the cluster
- Add CNI Flannel
- Add Nodes to cluster
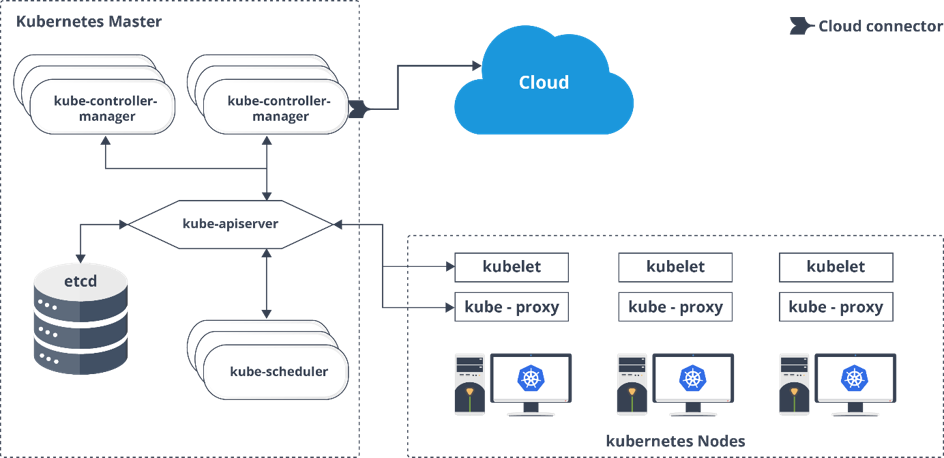
Kubernetes Components
Control Plane Components:
Control plane components typically run on Master node and make global decisions like scheduling pod, detecting, and responding cluster events, etc.
- kube-apiserver: Expose the Kubernetes API.
- etcd: Consistent and highly-available key-value store used as Kubernetes’ backing store for all cluster data.
- kube-scheduler: Watch newly created pods and schedule them on a suitable node.
- kube-controller-manager:
- Node controller
- Replication controller
- Endpoints controller
- Service Account & Token controllers
-
cloud-controller-manager: Cloud-specific control logic.
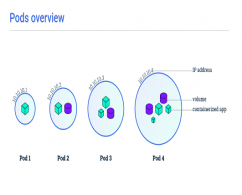
Node Components:
Node components run on every node, maintaining running pods and providing the Kubernetes runtime environment.
- kubelet: An agent that runs on each node in the cluster. It makes sure that containers are running in a Pod.
- kube-proxy: Network proxy that runs each node.
- container-runtime: Responsible for the running containers.
Installation
Step 1: Add docker and kubernetes repositories for Master and Worker nodes
You should run the following command sets on all three nodes to get gpg keys and add repositories.
#curl -fsSL https://download.docker.com/linux/ubuntu/gpg | sudo apt-key add -
#sudo add-apt-repository "deb [arch=amd64] https://download.docker.com/linux/ubuntu $(lsb_release -cs) stable"

#curl -s https://packages.cloud.google.com/apt/doc/apt-key.gpg | sudo apt-key add -

#cat << EOF | sudo tee /etc/apt/sources.list.d/kubernetes.list
deb https://apt.kubernetes.io/ kubernetes-xenial main
EOF

#sudo apt-get update
Step 2: Install docker, kubelet, kubeadm and kubectl for Master and Worker nodes
Perform these steps for all nodes in the cluster. If you need to install specific version of any component you can change it as you wish. Also, it's possible to check the latest version with "apt list" command.
#apt list  docker-ce
#sudo apt-get install -y docker-ce=5:19.03.8~3-0~ubuntu-bionic kubelet=1.18.2-00 kubeadm=1.18.2-00 kubectl=1.18.2-00
Step 3: Initialize Cluster
Run the following command in the master node to initialize the Kubernetes cluster. You should disable swap before running this step. "192.168.56.102" is private ip address of master server.
#sudo kubeadm init --apiserver-advertise-address 192.168.56.102 --pod-network-cidr=10.225.0.0/16
Your Kubernetes control-plane has initialized successfully!

To start using your cluster, you need to run the following as a regular user:

  mkdir -p $HOME/.kube
  sudo cp -i /etc/kubernetes/admin.conf $HOME/.kube/config
  sudo chown $(id -u):$(id -g) $HOME/.kube/config

You should now deploy a pod network to the cluster.
Run "kubectl apply -f [podnetwork].yaml" with one of the options listed at:
  https://kubernetes.io/docs/concepts/cluster-administration/addons/

Then you can join any number of worker nodes by running the following on each as root:

kubeadm join 192.168.56.102:6443 --token 1aa23n.cv2v8moy1eplc67e \
    --discovery-token-ca-cert-hash sha256:223ef1bf2d71a8bae2f0a05f02ec165efd4601aa4627dfd4dbaaf2a7dabbf887
root@master01:~#
Swap Error:
#sudo kubeadm init --apiserver-advertise-address 192.168.56.102 --pod-network-cidr=10.225.0.0/16
W0506 22:33:57.562106    7930 configset.go:202] WARNING: kubeadm cannot validate component configs for API groups [kubelet.config.k8s.io kubeproxy.config.k8s.io]
[init] Using Kubernetes version: v1.18.2
[preflight] Running pre-flight checks
        [WARNING IsDockerSystemdCheck]: detected "cgroupfs" as the Docker cgroup driver. The recommended driver is "systemd". Please follow the guide at https://kubernetes.io/docs/setup/cri/
error execution phase preflight: [preflight] Some fatal errors occurred:
        [ERROR Swap]: running with swap on is not supported. Please disable swap
[preflight] If you know what you are doing, you can make a check non-fatal with `--ignore-preflight-errors=...`
To see the stack trace of this error execute with --v=5 or higher
Step 4: Setup Default Configuration on Master node
  mkdir -p $HOME/.kube
  sudo cp -i /etc/kubernetes/admin.conf $HOME/.kube/config
  sudo chown $(id -u):$(id -g) $HOME/.kube/config
Step 5: Install Flannel for the Pod Network (On Master Node)
#kubectl apply -f https://raw.githubusercontent.com/coreos/flannel/2140ac876ef134e0ed5af15c65e414cf26827915/Documentation/kube-flannel.yml
# kubectl  get  pods -n kube-system
NAME                               READY   STATUS    RESTARTS   AGE
coredns-66bff467f8-26wzg           0/1     Pending   0          16m
coredns-66bff467f8-8xcph           0/1     Pending   0          16m
etcd-master01                      1/1     Running   0          16m
kube-apiserver-master01            1/1     Running   0          16m
kube-controller-manager-master01   1/1     Running   0          16m
kube-flannel-ds-amd64-vhmmv        1/1     Running   0          20s
kube-proxy-882x2                   1/1     Running   0          16m
kube-scheduler-master01            1/1     Running   0          16m
Step 6: Join Worker nodes to the cluster
root@worker01:~# kubeadm join 192.168.56.102:6443 --token 1aa23n.cv2v8moy1eplc67e  --discovery-token-ca-cert-hash sha256:223ef1bf2d71a8bae2f0a05f02ec165efd4601aa4627dfd4dbaaf2a7dabbf887
W0506 23:19:11.241333   19433 join.go:346] [preflight] WARNING: JoinControlPane.controlPlane settings will be ignored when control-plane flag is not set.
[preflight] Running pre-flight checks
        [WARNING IsDockerSystemdCheck]: detected "cgroupfs" as the Docker cgroup driver. The recommended driver is "systemd". Please follow the guide at https://kubernetes.io/docs/setup/cri/
[preflight] Reading configuration from the cluster...
[preflight] FYI: You can look at this config file with 'kubectl -n kube-system get cm kubeadm-config -oyaml'
[kubelet-start] Downloading configuration for the kubelet from the "kubelet-config-1.18" ConfigMap in the kube-system namespace
[kubelet-start] Writing kubelet configuration to file "/var/lib/kubelet/config.yaml"
[kubelet-start] Writing kubelet environment file with flags to file "/var/lib/kubelet/kubeadm-flags.env"
[kubelet-start] Starting the kubelet
[kubelet-start] Waiting for the kubelet to perform the TLS Bootstrap...

This node has joined the cluster:
* Certificate signing request was sent to apiserver and a response was received.
* The Kubelet was informed of the new secure connection details.

Run 'kubectl get nodes' on the control-plane to see this node join the cluster.

root@worker01:~#
Components and Cluster Status
Check components status:
root@master01:~# kubectl get cs
NAME                 STATUS    MESSAGE             ERROR
scheduler            Healthy   ok
controller-manager   Healthy   ok
etcd-0               Healthy   {"health":"true"}
Check cluster information:
root@master01:~# kubectl  cluster-info
Kubernetes master is running at https://192.168.56.102:6443
KubeDNS is running at https://192.168.56.102:6443/api/v1/namespaces/kube-system/services/kube-dns:dns/proxy

To further debug and diagnose cluster problems, use 'kubectl cluster-info dump'.
root@master01:~# # kubectl version --short
Client Version: v1.18.2
Server Version: v1.18.2
Check node information:
root@master01:~# kubectl  get  nodes  -o wide
NAME       STATUS   ROLES    AGE   VERSION   INTERNAL-IP      EXTERNAL-IP   OS-IMAGE             KERNEL-VERSION     CONTAINER-RUNTIME
master01   Ready    master   34m   v1.18.2   192.168.56.102   <none>        Ubuntu 18.04.4 LTS   5.3.0-28-generic   docker://19.3.8
worker01   Ready    <none>   32m   v1.18.2   192.168.56.103   <none>        Ubuntu 18.04.4 LTS   5.3.0-28-generic   docker://19.3.8
Check controller-manager version:
root@master01:~# kubectl  get  pod kube-controller-manager-master01 -o yaml -n kube-system|grep image:
            f:image: {}
    image: k8s.gcr.io/kube-controller-manager:v1.18.2
    image: k8s.gcr.io/kube-controller-manager:v1.18.2
Check kubeadm version:
root@master01:~# kubeadm version
kubeadm version: &version.Info{Major:"1", Minor:"18", GitVersion:"v1.18.2", GitCommit:"52c56ce7a8272c798dbc29846288d7cd9fbae032", GitTreeState:"clean", BuildDate:"2020-04-16T11:54:15Z", GoVersion:"go1.13.9", Compiler:"gc", Platform:"linux/amd64"}
Run a deployment check if the application is running on pod:
root@master01:~# kubectl  create deployment  nginx --image=nginx
deployment.apps/nginx created
root@master01:~# kubectl  get pods
NAME                    READY   STATUS              RESTARTS   AGE
nginx-f89759699-2cxgc   0/1     ContainerCreating   0          6s

root@master01:~# kubectl  port-forward nginx-f89759699-2cxgc 8081:80 &
[1] 29150
root@master01:~# Forwarding from 127.0.0.1:8081 -> 80
Forwarding from [::1]:8081 -> 80

root@master01:~# curl -s  -v  http://127.0.0.1:8081